User Guide
Truck Profit shows you what you actually made on every run. Log loads and expenses from the cab — or snap a photo of a rate con or fuel receipt and let on-device AI fill in the details — and the app keeps your Gross, Net, rate per mile, and cost per mile up to date as you go. There's no account to create.
- Trip — One run, from the day you leave to the day you're done. Loads and expenses live inside it. You have one active trip at a time.
- Load — A single haul within a trip: pickup, one or more drops, gross pay, loaded and deadhead miles.
- Expense — Anything you pay for along the way: fuel, DEF, tolls, lumper, repairs, insurance — 40+ trucking categories.
01Getting started
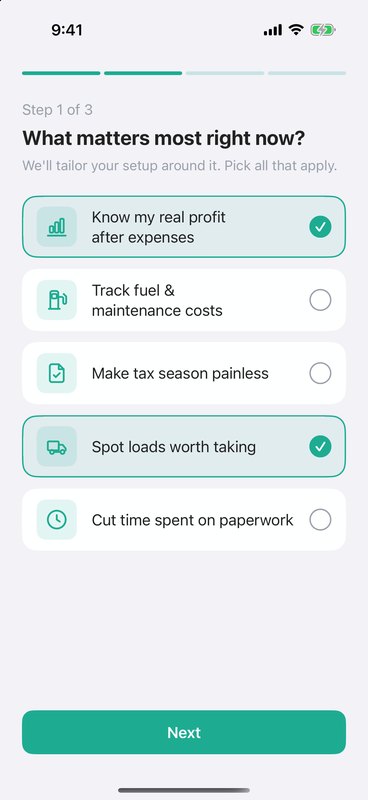
The first time you open Truck Profit, it asks two quick questions — what matters most to you (real profit, fuel and maintenance costs, tax season, picking better loads, less paperwork) and what's slowing you down today. Based on your answers, it shows the three features that will help you most from day one.
After that you land on the Trip tab. The app has four tabs: Trip, History, Analytics, and Settings. No sign-up, no email — just start your first trip.
02Starting a trip
Start a trip when you head out — everything you haul and spend until you're back gets tracked against it.
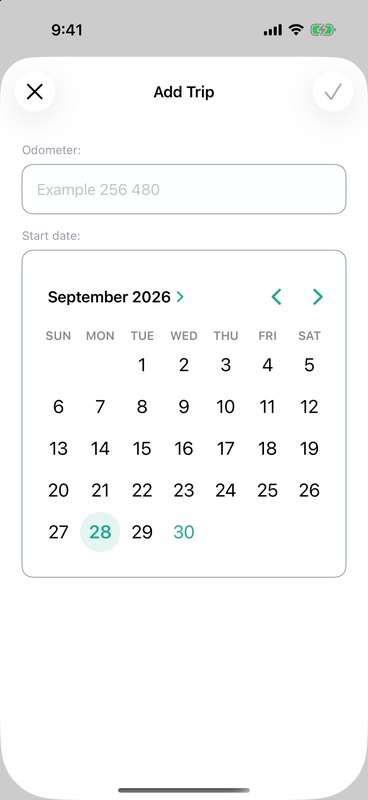
- On the Trip tab, tap the green + button (bottom right).
- Enter your Odometer reading.
- Pick the Start date on the calendar.
- Tap the checkmark to save.
That's it — the trip is live. From now on, the + button opens the trip menu instead of creating a new trip.
03The Trip screen
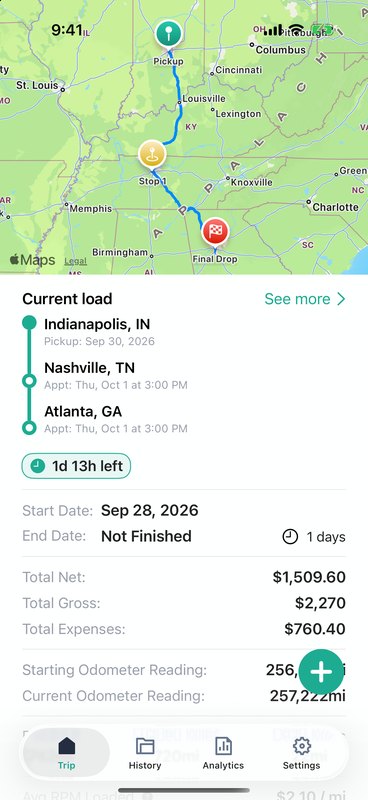
While a trip is active, the Trip tab is your dashboard. Everything updates the moment you add a load or an expense.
- Current load — a map of the route with pickup and drops, plus a countdown to the delivery appointment. If you're running late it switches to OVERDUE.
- Total Net, Total Gross, Total Expenses — where the trip stands right now.
- Starting and Current Odometer Reading, plus Distance, Loaded Miles, Dead Miles — running mileage for the trip.
- Avg RPM Loaded and Avg RPM W/DH — your rate per mile on loaded miles only, and with deadhead included.
- Recent Expenses — the latest costs; tap See All for the full list. Tap any expense to open it, then use the pencil to edit or the trash icon to delete.
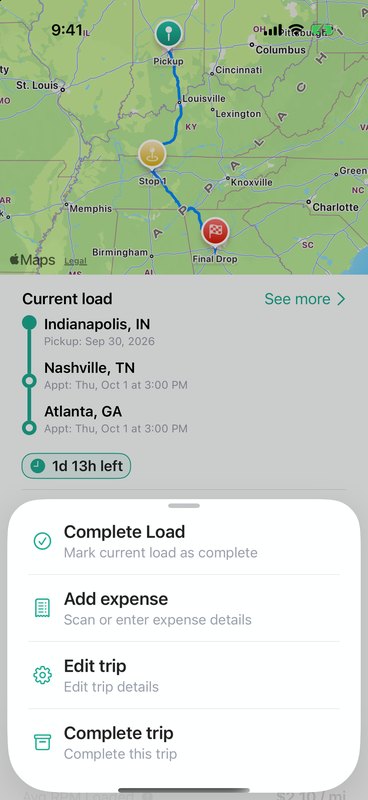
Tap + to open the trip menu: Add load (or Complete Load while a load is in progress), Add expense, Edit trip, and Complete trip. Tap See more next to the current load to see every load in the trip with its gross, miles, and rate per mile.
04Adding a load
Tap + → Add load each time you pick up freight. Type the details in, or tap the scan button in the corner to fill them from your paperwork (see the next section).
- Origin and Destination — search for an address, use your current location, or enter city and state manually. Tap Add destination for multi-stop loads.
- Load date — the pickup date.
- Delivery Date — the appointment date and time. Leave it empty if the delivery is still open.
- Gross — what the load pays.
- Mileages — loaded miles.
- Dead mileages — empty miles to get to the pickup (0 is fine).
- Notes — load number, broker, anything you want to remember.
Tap the checkmark to save. The load appears on the Trip screen with its route and rate per mile.
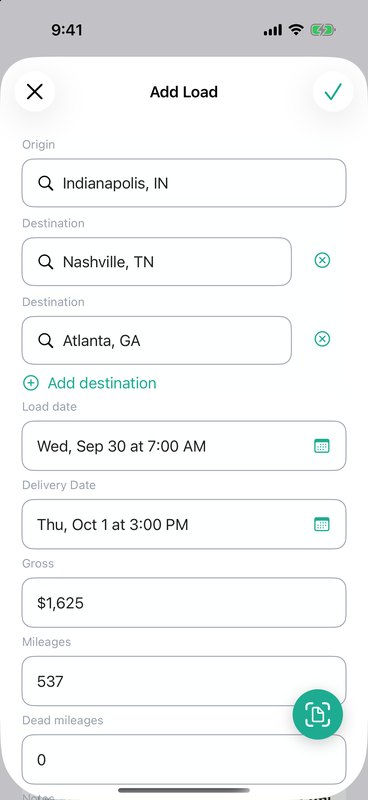
One load at a time: while a load is in progress, the + menu shows Complete Load in place of Add load. Deliver it, mark it complete, and you can add the next one.
05Scanning load documents
Skip the typing: point your camera at a rate confirmation, BOL, or dispatch sheet and Truck Profit fills in the load for you.
- In the Add Load form, tap the scan button (bottom right).
- Tap Start Scanning to use the camera, or Choose from Gallery for a photo or screenshot you already have.
- The app reads the document, pulls out the pickup and delivery addresses, dates and appointment times, gross pay, and miles, then checks the addresses and calculates the route.
- Check the Extracted Information — the completeness badge tells you how much it found — and tap Review & Create Load.
- The Add Load form opens pre-filled. Fix or add anything that's missing, then save.
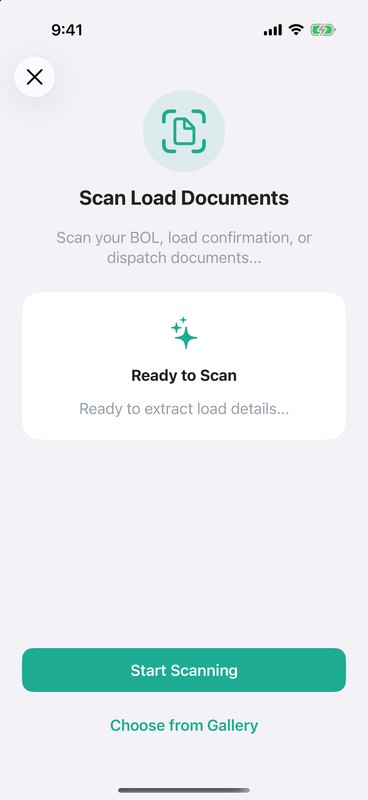
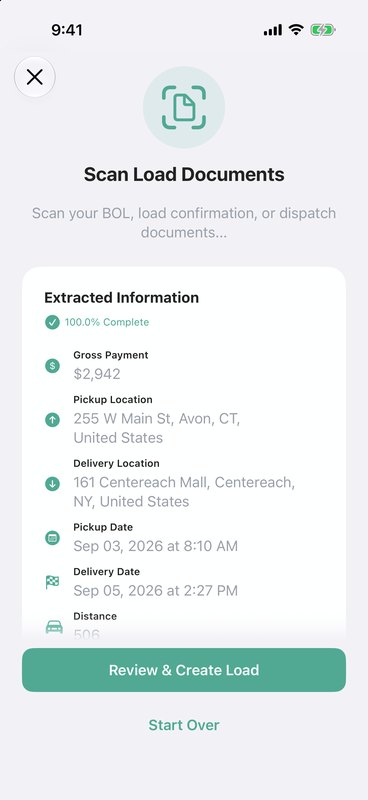
Requirements & privacy: AI scanning uses Apple Intelligence, so it needs an iPhone 15 Pro or newer on iOS 26 or later, with Apple Intelligence turned on in Settings. Everything runs on your iPhone — it works offline, and your documents are never uploaded. On other devices, just enter the load by hand.
06Adding expenses
Log costs as they happen — every dollar out comes straight off your Net and shows up in your cost per mile.
- Tap + → Add expense.
- Enter the Date and Amount.
- Choose a Category (required).
- For fuel, DEF, and reefer fuel, enter the Volume in gallons.
- Optionally add the Merchant and a Note, then tap the checkmark.
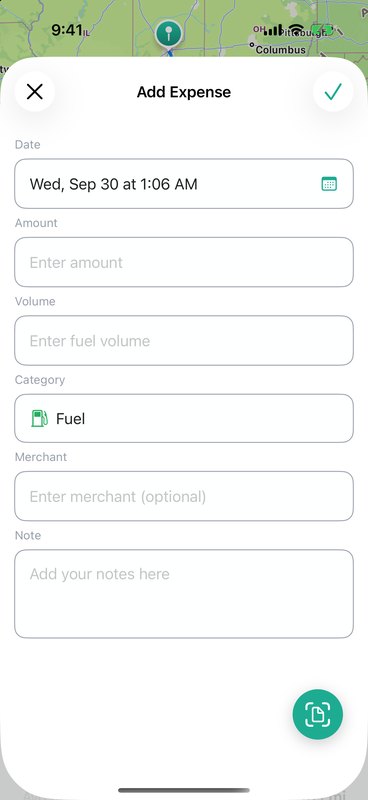
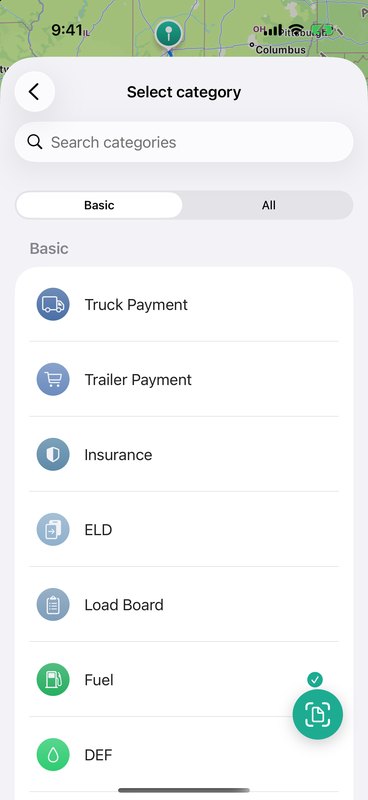
The category list is built for trucking: fuel, DEF, tires, parts & repairs, tolls, scales, lumper fees, dispatch and factoring fees, truck and trailer payments, insurance, ELD and load board subscriptions, IFTA, HVUT (Form 2290), IRP plates, per-diem meals, and more. Basic shows the everyday ones, All shows the full list, and categories you use often appear under Recently used.
Search tip: the category search understands trucker shorthand — type "2290" to find HVUT or "adblue" to find DEF.
07Scanning receipts
Snap the receipt at the pump and you're done. In the Add Expense form, tap the scan button, then Start Scanning or Choose from Gallery.
The AI reads the merchant, total, date, and gallons, and picks the category for you. Tap Review & Create Expense, check the pre-filled form, and save. The receipt photo stays attached to the expense — tap it any time to see the original.
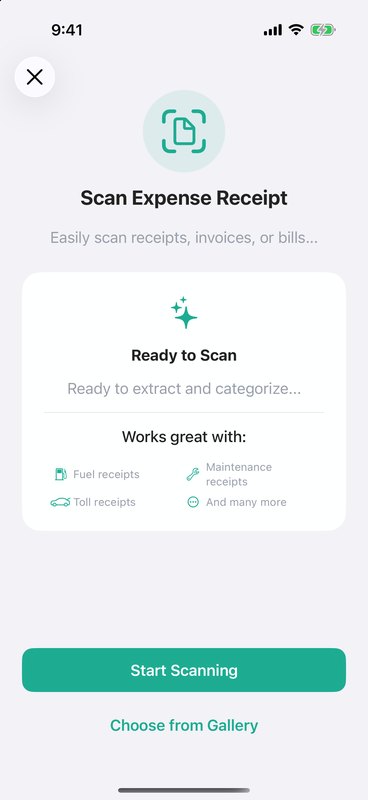
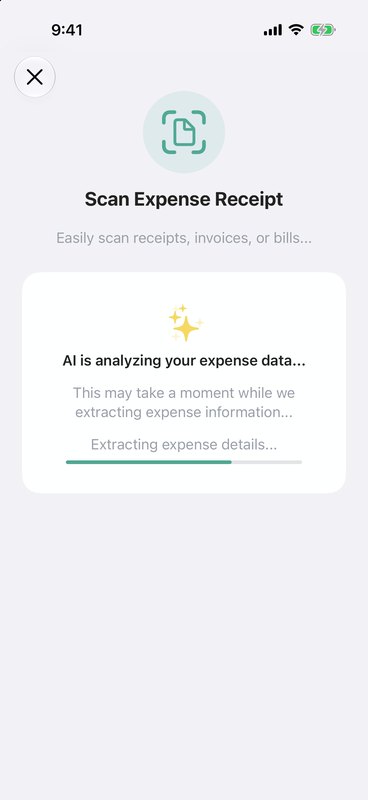
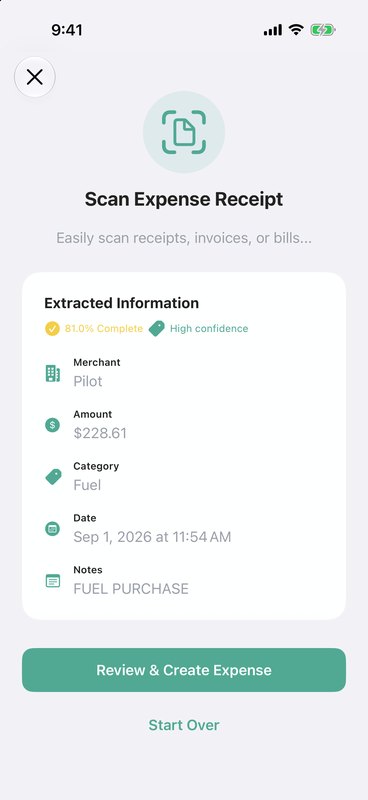
Works for fuel receipts, repair invoices, toll and scale tickets, and bills. The same requirements apply as for load scanning (iPhone 15 Pro or newer, iOS 26+, Apple Intelligence on).
Keep a copy: with Save Scans to Photos on (Settings tab — it's on by default), every scanned receipt and document is also saved to your Camera Roll.
08Completing loads & trips
After delivery, tap + → Complete Load and confirm the date it was delivered. The load moves into the trip's load history and you're ready to add the next one.
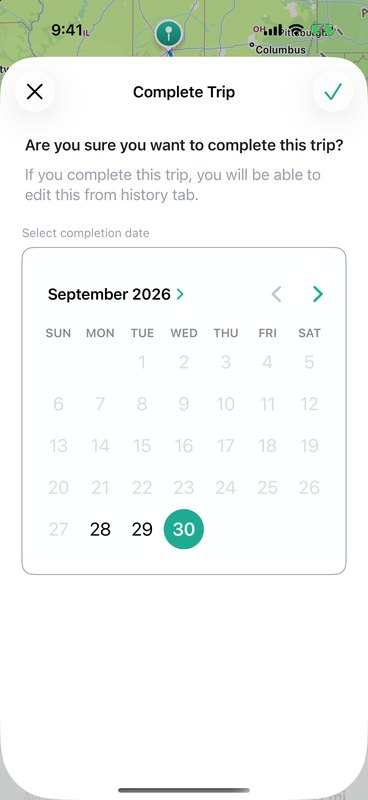
Complete a tripWhen the run is over, tap + → Complete trip and pick the completion date (it can't be earlier than the start date). The trip moves to History and the Trip tab is clear for your next run.
Made a mistake? Completed trips can still be edited from History.
09History
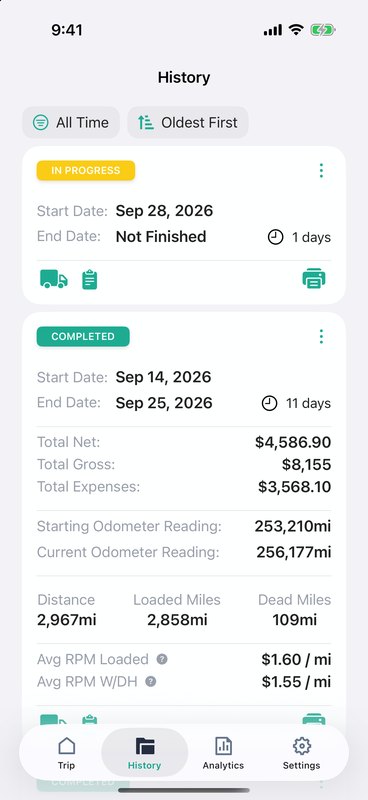
The History tab lists every trip — active and completed — with its status, dates, and length. Tap a card to expand it and see Net, Gross, Expenses, odometer readings, miles, and average RPM.
The icons on each card open the trip's loads (truck), expenses (clipboard), and report (printer). Tap ⋮ to complete, edit, or delete the trip.
Use the filter to narrow the list — This Week, Last 7 Days, This Month, Last Month, This Year, Last 12 Months, All Time, or a custom date range — and sort by newest or oldest first.
Deleted a trip by accident? Tap Undo on the banner that appears, or shake your iPhone to bring it back — loads and expenses included.
10Trip reports (PDF)
Turn any trip into a clean PDF for your dispatcher, factoring company, or accountant.
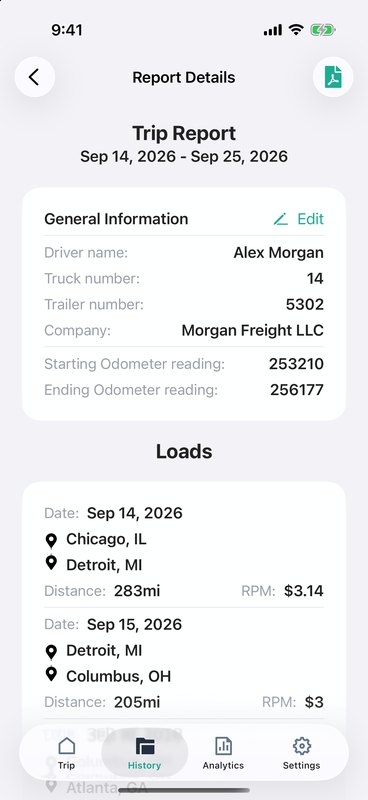
- In History, tap the printer icon on a trip.
- Under General Information, tap Edit to add the driver name, truck number, trailer number, and company. They're remembered for next time.
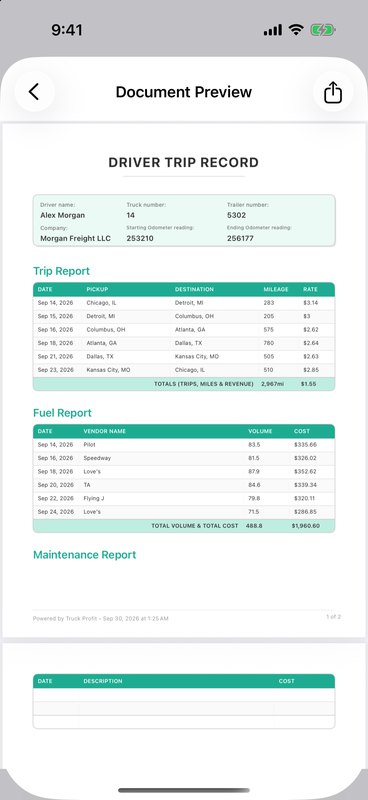
- Review the Loads, Fuel, and Maintenance sections — the PDF turns them into a trip report, fuel report, and maintenance report.
- Tap the PDF icon (top right) to generate the report, then share it via Mail, Messages, AirDrop, or save it to Files.
11Analytics
The Analytics tab shows how your business is doing over a week, month, or year — and how that compares to the period before.
- Overview — Gross, Net, Expenses, Profit Margin, Distance Driven, and Cost per Mile, each with the change vs. the previous period. Tap the info icon for a plain-English explanation of every metric.
- Revenue vs Expenses — switch between Net, Gross, and Expenses to compare this period with the previous one.
- Expenses Breakdown — where your money goes, by category.
- Top Trips by Profit — your best runs, with net, miles, and average RPM.
To change the period, tap the calendar icon (top right). Choose Weekly, Monthly, or Yearly, pick the main period, and pick the period to compare it against. Match length keeps the comparison fair when the current period isn't over yet — for example, Aug 1–10 vs. Jul 1–10 instead of the whole of July.
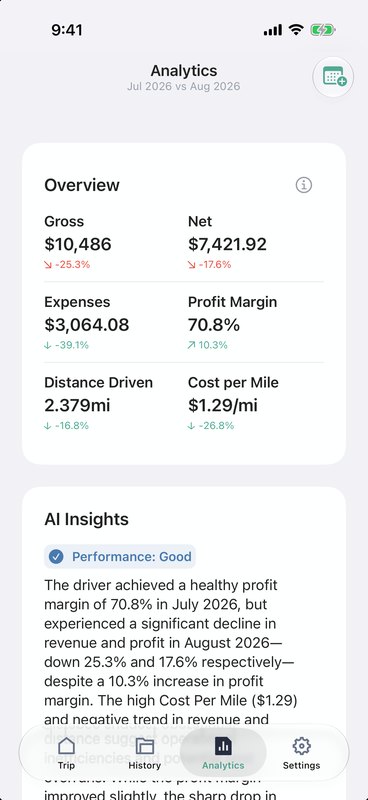
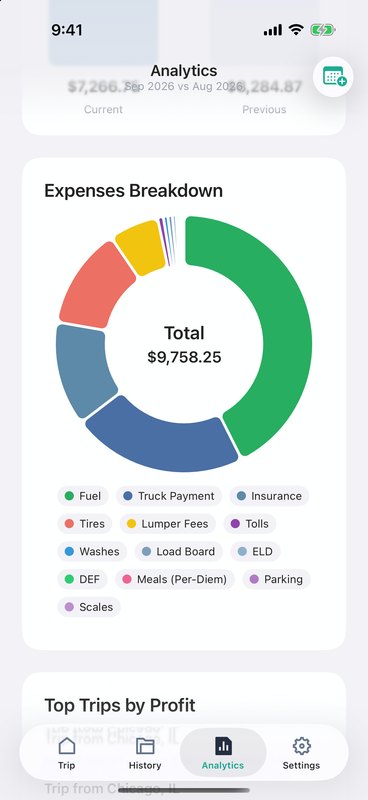
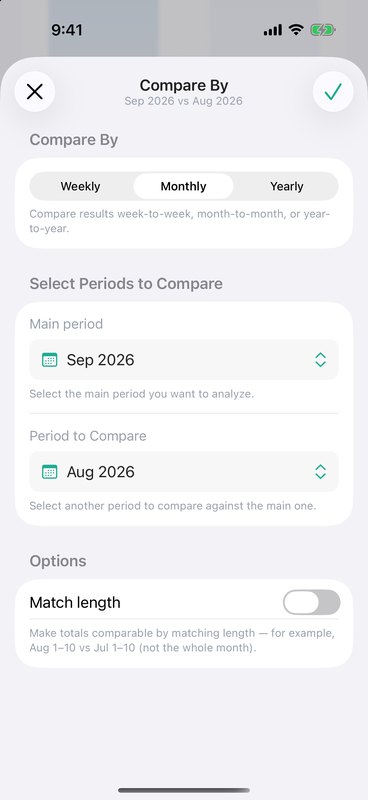
Know your CPM: Cost per Mile = Expenses ÷ Distance Driven, and Profit Margin = Net ÷ Gross × 100. If a load's rate per mile is below your cost per mile, you're paying to haul it.
12AI Insights
On the Analytics tab, the AI Insights card reads your numbers for the selected period and tells you what they mean: an overall performance rating, a short summary, and the key findings behind it.
Tap View Full Analysis for the full report — Executive Summary, Key Findings, Areas for Improvement, Opportunities, Risks & Concerns, Industry Benchmarks, and Action Items. Each finding is tagged High, Medium, or Low so you know what to look at first.
Insights refresh when you change the period, and they're shown in the language you've picked in the app.
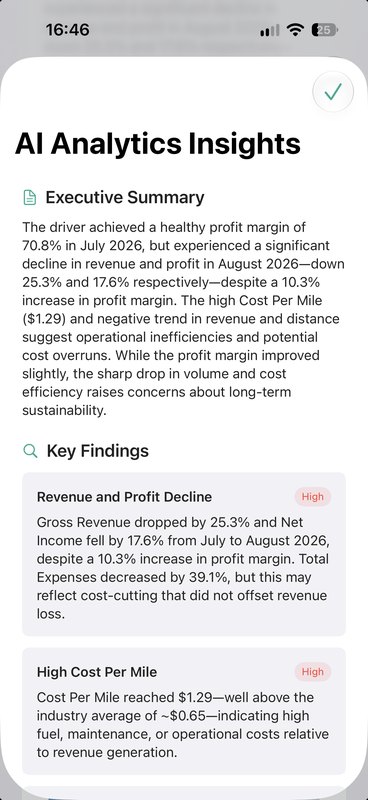
On-device: AI Insights run on Apple Intelligence right on your iPhone (iPhone 15 Pro or newer, iOS 26+). Your financial data never leaves the device. If the card says there isn't enough data, pick a period that has trips in it.
13Settings, backup & CSV export
The Settings tab holds your plan, backup status, and app settings.
- iCloud backup — your trips sync to your private iCloud automatically. The status row under your plan shows whether sync is working and when it last synced. Getting a new iPhone? Sign in with the same Apple ID and your data comes back.
- Export Data as CSV — pick a date range and get a spreadsheet of your trips, with every load and expense, ready for Excel, Google Sheets, or your accountant.
- Language — English, Spanish, Polish, Ukrainian, Russian, or Belarusian.
- Save Scans to Photos — keep a copy of every scanned document in your Camera Roll.
- Notification Settings — reminders to close out an open trip and a weekly summary of your profit.
- Restore Purchases — bring your Pro subscription back after reinstalling or switching phones.
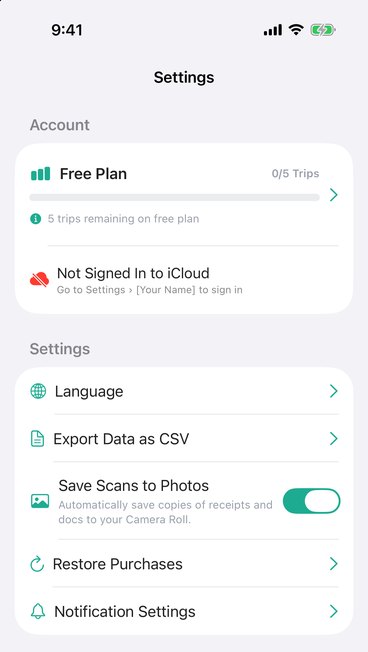
Sync not working? If the status row says Not Signed In to iCloud, sign in under iPhone Settings → [your name], and make sure iCloud is turned on for Truck Profit. If it says iCloud Storage Full, free up space and syncing resumes on its own.
14Free vs. Pro
Truck Profit is free to start. The free plan includes 5 trips with everything else unlocked — AI scanning, analytics, AI Insights, PDF reports, and CSV export. The Settings tab shows how many free trips you have left. Once you've used them, you'll need Pro to start a new trip; your existing trips, history, and reports stay available.
Pro removes the trip limit entirely. Choose Weekly (with a 3-day free trial), Monthly, or Yearly billing. Subscriptions renew automatically — manage or cancel any time in the iPhone Settings app under your Apple ID → Subscriptions.
15Need help?
For support, feature requests, or questions about using Truck Profit:
- In the app, go to Settings → Get in touch, or Request Feature to suggest something new.
- Email us at support@nvklabs.com
This document was last updated on September 29, 2026.